Seeding your database
Populate your database with initial data for reproducible environments across local and testing.
What is seed data?
Seeding is the process of populating a database with initial data, typically used to provide sample or default records for testing and development purposes. You can use this to create "reproducible environments" for local development, staging, and production.
Using seed files
Seed files are executed the first time you run supabase start and every time you run supabase db reset. Seeding occurs after all database migrations have been completed. As a best practice, only include data insertions in your seed files, and avoid adding schema statements.
By default, if no specific configuration is provided, the system will look for a seed file matching the pattern supabase/seed.sql. This maintains backward compatibility with earlier versions, where the seed file was placed in the supabase folder.
You can add any SQL statements to this file. For example:
123456insert into countries (name, code)values ('United States', 'US'), ('Canada', 'CA'), ('Mexico', 'MX');If you want to manage multiple seed files or organize them across different folders, you can configure additional paths or glob patterns in your config.toml (see the next section for details).
Splitting up your seed file
For better modularity and maintainability, you can split your seed data into multiple files. For example, you can organize your seeds by table and include files such as countries.sql and cities.sql. Configure them in config.toml like so:
123[db.seed]enabled = truesql_paths = ['./countries.sql', './cities.sql']Or to include all .sql files under a specific folder you can do:
123[db.seed]enabled = truesql_paths = ['./seeds/*.sql']The CLI processes seed files in the order they are declared in the sql_paths array. If a glob pattern is used and matches multiple files, those files are sorted in lexicographic order to ensure consistent execution. Additionally:
- The base folder for the pattern matching is
supabaseso./countries.sqlwill search forsupabase/countries.sql - Files matched by multiple patterns will be deduplicated to prevent redundant seeding.
- If a pattern does not match any files, a warning will be logged to help you troubleshoot potential configuration issues.
Generating seed data
You can generate seed data for local development using Snaplet.
To use Snaplet, you need to have Node.js and npm installed. You can add Node.js to your project by running npm init -y in your project directory.
If this is your first time using Snaplet to seed your project, you'll need to set up Snaplet with the following command:
1npx @snaplet/seed initThis command will analyze your database and its structure, and then generate a JavaScript client which can be used to define exactly how your data should be generated using code. The init command generates a configuration file, seed.config.ts and an example script, seed.ts, as a starting point.
During init if you are not using an Object Relational Mapper (ORM) or your ORM is not in the supported list, choose node-postgres.
In most cases you only want to generate data for specific schemas or tables. This is defined with select. Here is an example seed.config.ts configuration file:
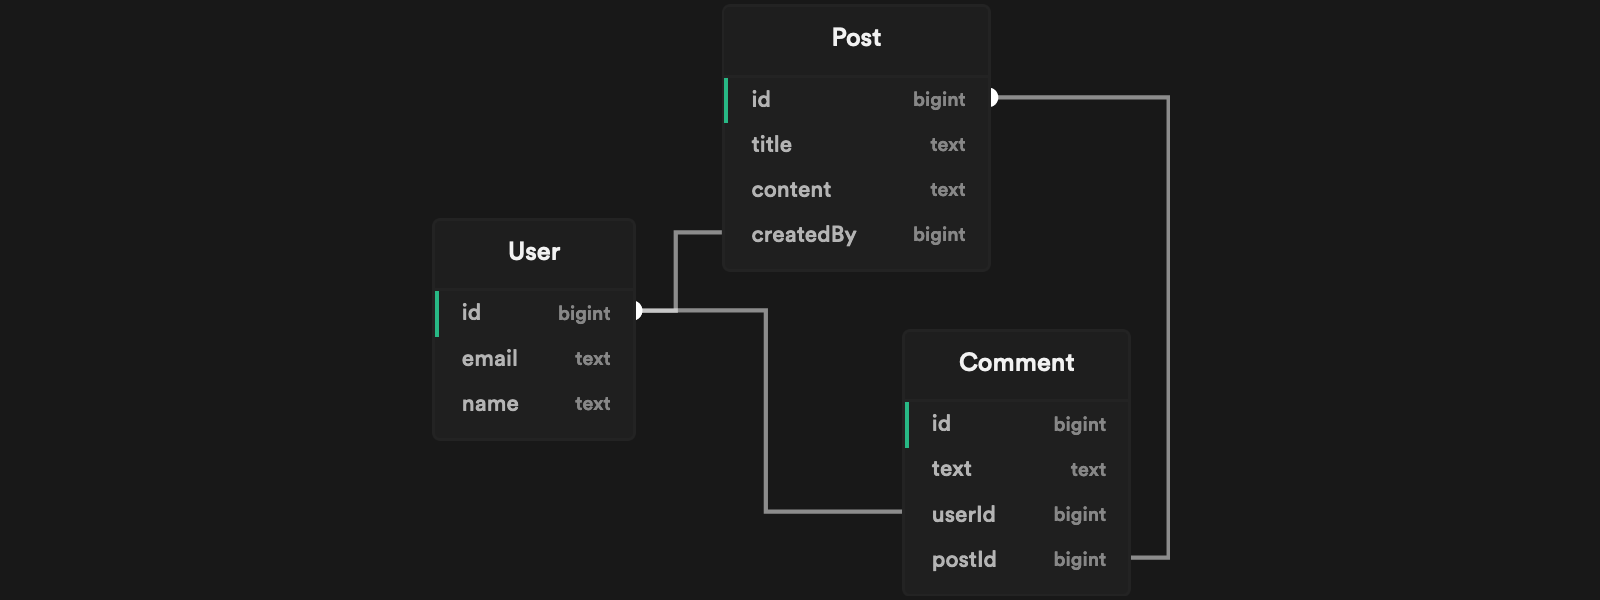
1234567891011export default defineConfig({ adapter: async () => { const client = new Client({ connectionString: 'postgresql://postgres:postgres@localhost:54322/postgres', }) await client.connect() return new SeedPg(client) }, // We only want to generate data for the public schema select: ['!*', 'public.*'],})Suppose you have a database with the following schema:

You can use the seed script example generated by Snaplet seed.ts to define the values you want to generate. For example:
- A
Postwith the title"There is a lot of snow around here!" - The
Post.createdByuser with an email address ending in"@acme.org" - Three
Post.commentsfrom three different users.
1234567891011121314151617181920212223import { createSeedClient } from '@snaplet/seed'import { copycat } from '@snaplet/copycat'async function main() { const seed = await createSeedClient({ dryRun: true }) await seed.Post([ { title: 'There is a lot of snow around here!', createdBy: { email: (ctx) => copycat.email(ctx.seed, { domain: 'acme.org', }), }, Comment: (x) => x(3), }, ]) process.exit()}main()Running npx tsx seed.ts > supabase/seed.sql generates the relevant SQL statements inside your supabase/seed.sql file:
123456789101112131415161718-- The `Post.createdBy` user with an email address ending in `"@acme.org"`INSERT INTO "User" (name, email) VALUES ("John Snow", "snow@acme.org")--- A `Post` with the title `"There is a lot of snow around here!"`INSERT INTO "Post" (title, content, createdBy) VALUES ( "There is a lot of snow around here!", "Lorem ipsum dolar", 1)--- Three `Post.Comment` from three different users.INSERT INTO "User" (name, email) VALUES ("Stephanie Shadow", "shadow@domain.com")INSERT INTO "Comment" (text, userId, postId) VALUES ("I love cheese", 2, 1)INSERT INTO "User" (name, email) VALUES ("John Rambo", "rambo@trymore.dev")INSERT INTO "Comment" (text, userId, postId) VALUES ("Lorem ipsum dolar sit", 3, 1)INSERT INTO "User" (name, email) VALUES ("Steven Plank", "s@plank.org")INSERT INTO "Comment" (text, userId, postId) VALUES ("Actually, that's not correct...", 4, 1)Whenever your database structure changes, you will need to regenerate @snaplet/seed to keep it in sync with the new structure. You can do this by running:
1npx @snaplet/seed syncYou can further enhance your seed script by using Large Language Models to generate more realistic data. To enable this feature, set one of the following environment variables in your .env file:
12OPENAI_API_KEY=<your_openai_api_key>GROQ_API_KEY=<your_groq_api_key>After setting the environment variables, run the following commands to sync and generate the seed data:
12npx @snaplet/seed syncnpx tsx seed.ts > supabase/seed.sqlFor more information, check out Snaplet's seed documentation